Difference between revisions of "Distribution Plot"
| (5 intermediate revisions by the same user not shown) | |||
| Line 1: | Line 1: | ||
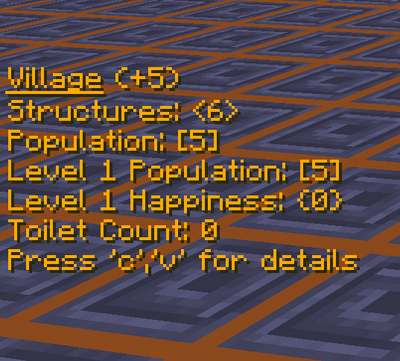
'''Pro Tips:''' Hit 'c' and 'v' keys (or something else if you choose to remap them) to bring up more detailed analytics about the current status of your [[Island Distribution Nexus]]. | '''Pro Tips:''' Hit 'c' and 'v' keys (or something else if you choose to remap them) to bring up more detailed analytics about the current status of your [[Island Distribution Nexus]]. | ||
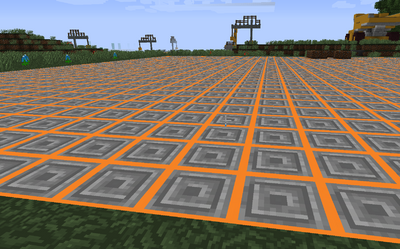
[[File:Empty_Village_Plot.png|thumb|400px|right|'''Figure 1:''' This is the area where you can help improve the [[Efficiency]] of [[Polycraft World Delivery Bots|delivery bots]] in [[Warehousing|engineered structures]]]]. | [[File:Empty_Village_Plot.png|thumb|400px|right|'''Figure 1:''' This is the area where you can help improve the [[Efficiency]] of [[Polycraft World Delivery Bots|delivery bots]] in [[Warehousing|engineered structures]]]]. | ||
| − | [[File:Village_Plot_Data.png|thumb|400px|right|'''Figure 2:''' When you wander into the [[Distribution Plot]], dynamic scoring shows you key metrics about your [[Distribution Complex]]. The top number is the current value of your [[Distribution Complex]] as built that contributes to your [[Score Through the Aegis]]. You can also see how many valid structures your team has built, your [[Robot Population Capacity]] and your [[Efficiency]] at the [[Technology Level]] that warehouses the most robots in your current distribution plot configuration. You also see a count of [[Utility Buildings]] referenced by their special block (i.e. Generator for an Electrical Closet) at your current [[Technology Level]]. Typing 'c' or 'v' on the keyboard while you are on the [[Distribution Plot]] opens up more advanced analytics windows that can help the very best civic engineers maximize the impact of your robotic workers.]] | + | [[File:Village_Plot_Data.png|thumb|400px|right|'''Figure 2:''' When you wander into the [[Distribution Plot]], dynamic scoring shows you key metrics about your [[Distribution Complex]]. The top number is the current value of your [[Distribution Complex]] as built that contributes to your [[Score Through the Aegis]]. You can also see how many valid structures your team has built, your [[Robot Population Capacity]] and your [[Efficiency]] at the [[Technology Level (GLC)|Technology Level]] that [[Warehousing|warehouses]] the most [[Polycraft World Delivery Bots|robots]] in your current [[Distribution Plot|distribution plot]] configuration. You also see a count of [[Utility Buildings]] referenced by their special block (i.e. Generator for an Electrical Closet) at your current [[Technology Level (GLC)|Technology Level]]. Typing 'c' or 'v' on the keyboard while you are on the [[Distribution Plot]] opens up more advanced analytics windows that can help the very best civic engineers maximize the impact of your robotic workers.]] |
==Description== | ==Description== | ||
| − | Your team has been given a specially-designated 48 block x 48 block area on your own [[Island Logistics Nexus]] to build a | + | Your team has been given a specially-designated 48 block x 48 block area on your own [[Island Logistics Nexus]] to build a goods' [[Distribution Complex]] to accommodate your [[Polycraft World Delivery Bots|delivery bots]] and enable you to provide for the populations in need. The [[Distribution Plot]] is designated by a special type of block (example image to the right). Any buildings you build with Door and entryways not on top of the Distribution Plot will not be suitable to be used as a [[Warehousing|warehouse]], and will not count towards your [[Distribution Score]]. Portions of your engineered structures however can hang off of the [[Distribution Plot]]. |
| − | Over the course of the challenge, you will construct different structures on the [[Distribution Plot]] including [[Warehousing| | + | Over the course of the challenge, you will construct different structures on the [[Distribution Plot]] including [[Warehousing|warehouses]] and [[Utility Buildings]]. Depending on the [[Technology Level (GLC)|Technology Level]] of the [[Warehousing|warehouse]], it has a maximum allowable footprint and its walls must be made of a certain fraction of the material of that [[Technology Level (GLC)|technology]] (i.e. Dirt, Wood, Stone, or [[Block (Polexiglas)|Polexiglas]]) in phase 1. As you progress through the [[Technology Level (GLC)|technology levels]], your team will be able to make structures that enable [[Polycraft World Delivery Bots|robots]] to work more densely and efficiently and eventually be able to build on multiple stories. Much of the score in this challenge comes from building and destroying your [[Distribution Complex]] on the [[Distribution Plot]] as you get access to new and better building materials, [[Charging Stations]] and [[Utility Buildings]]. In the early stages of your challenge, it is easier to keep your [[Polycraft World Delivery Bots|robots]] population [[Efficiency|efficient]], perhaps just with access to a Generator. As your teams tries to improve its [[Score Through the Aegis]], it will become a greater and greater engineering challenge to make sure your [[Polycraft World Delivery Bots|robots]] have access to all of the appropriate [[Utility Buildings|utilities]] which governs your [[Efficiency|Utility Score]]. |
| − | have access to all of the appropriate utilities which governs your Utility Score. | ||
| − | The Distribution Plot is likely to be the central focus area of your team during the [[2023 BEST Robotics - Global Logistics Challenge]]. It is recommended that you store your own resources nearby and ensure easy access to the [[Distribution Plot]] from all sides of the island. To do well, you will need to explore the island and | + | The [[Distribution Plot]] is likely to be the central focus area of your team during the [[2023 BEST Robotics - Global Logistics Challenge]]. It is recommended that you store your own resources nearby and ensure easy access to the [[Distribution Plot]] from all sides of the island. To do well, you will need to explore the island and solve the [[Polycraft Recycling and Waste Scavenger Hunt|Scavenger Hunt]] mysteries, but you will find yourselves returning to the [[Distribution Plot]] to increase the numbers and efficiency of [[Polycraft World Delivery Bots|Delivery Bots]] that will distribute goods to the affected Polycraft World zones. |
| + | |||
| + | ---- | ||
| + | == Useful Internal Links == | ||
| + | [[Main Page|Polycraft World Main Page]] | [[BEST Robotics Polycraft 3D Printing Challenge|3D Printing Challenge]] | [[2023 BEST Robotics - Refugee Crisis Challenge|Refugee Crisis Challenge Home]] | [[2023 BEST Robotics - Global Logistics Challenge|Global Logistics Challenge]] | [[Island Logistics Nexus]] | [[Distribution Complex]] | [[Distribution Plot]] | [[Polycraft World Delivery Bots|Robots]] | [[Warehousing]] | [[Utility Buildings]] | [[Efficiency]] | [[Robot Population Capacity]] | [[3D Printer]] | [[3D Scanner]] | [[Global Logistics Challenge Scoring Phase 1|Phase I Scoring]] | [[Global Logistics Challenge Scoring Phase 2|Phase II Scoring]] | [[Score Through the Aegis]] | [[Charging Stations]] | [[Technology Level (GLC)]] | ||
Latest revision as of 19:52, 6 March 2023
Pro Tips: Hit 'c' and 'v' keys (or something else if you choose to remap them) to bring up more detailed analytics about the current status of your Island Distribution Nexus.

.

Description
Your team has been given a specially-designated 48 block x 48 block area on your own Island Logistics Nexus to build a goods' Distribution Complex to accommodate your delivery bots and enable you to provide for the populations in need. The Distribution Plot is designated by a special type of block (example image to the right). Any buildings you build with Door and entryways not on top of the Distribution Plot will not be suitable to be used as a warehouse, and will not count towards your Distribution Score. Portions of your engineered structures however can hang off of the Distribution Plot.
Over the course of the challenge, you will construct different structures on the Distribution Plot including warehouses and Utility Buildings. Depending on the Technology Level of the warehouse, it has a maximum allowable footprint and its walls must be made of a certain fraction of the material of that technology (i.e. Dirt, Wood, Stone, or Polexiglas) in phase 1. As you progress through the technology levels, your team will be able to make structures that enable robots to work more densely and efficiently and eventually be able to build on multiple stories. Much of the score in this challenge comes from building and destroying your Distribution Complex on the Distribution Plot as you get access to new and better building materials, Charging Stations and Utility Buildings. In the early stages of your challenge, it is easier to keep your robots population efficient, perhaps just with access to a Generator. As your teams tries to improve its Score Through the Aegis, it will become a greater and greater engineering challenge to make sure your robots have access to all of the appropriate utilities which governs your Utility Score.
The Distribution Plot is likely to be the central focus area of your team during the 2023 BEST Robotics - Global Logistics Challenge. It is recommended that you store your own resources nearby and ensure easy access to the Distribution Plot from all sides of the island. To do well, you will need to explore the island and solve the Scavenger Hunt mysteries, but you will find yourselves returning to the Distribution Plot to increase the numbers and efficiency of Delivery Bots that will distribute goods to the affected Polycraft World zones.
Useful Internal Links
Polycraft World Main Page | 3D Printing Challenge | Refugee Crisis Challenge Home | Global Logistics Challenge | Island Logistics Nexus | Distribution Complex | Distribution Plot | Robots | Warehousing | Utility Buildings | Efficiency | Robot Population Capacity | 3D Printer | 3D Scanner | Phase I Scoring | Phase II Scoring | Score Through the Aegis | Charging Stations | Technology Level (GLC)